
Introduction
Growing lemon trees from cuttings is a rewarding and straightforward process. Not only does it allow you to cultivate your own citrus fruits, but it also ensures that the new plants inherit the characteristics of the parent tree. This guide will walk you through the easiest method to propagate lemon trees from cuttings, helping you enjoy fresh lemons from your own garden. Follow these detailed steps to achieve successful propagation and ensure healthy growth for your lemon trees.
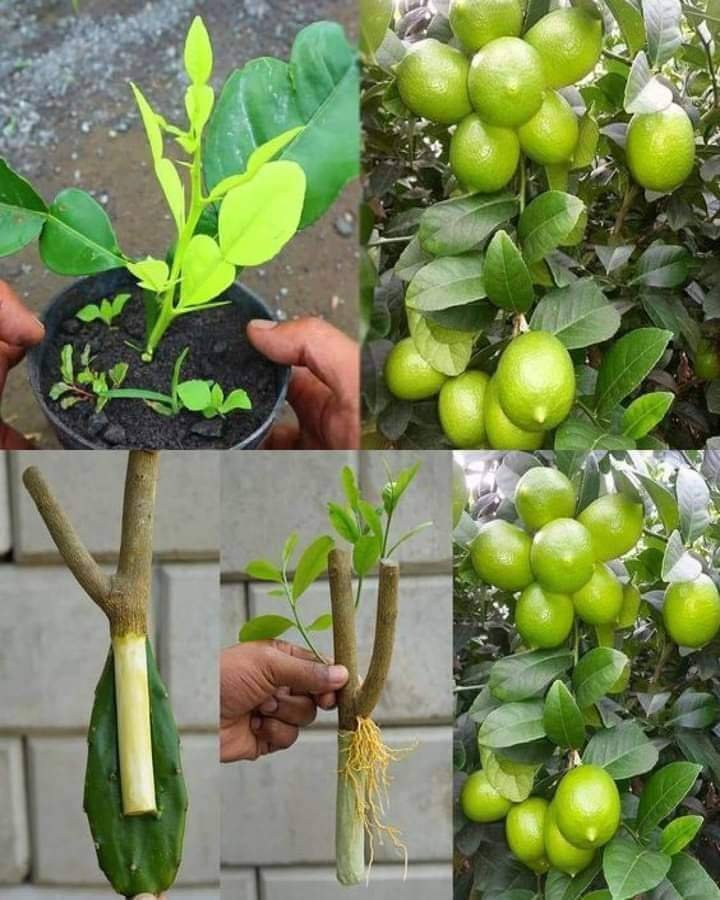
Step 1: Gather Materials
To start, you need to gather all the necessary materials for propagating lemon cuttings. Ensure you have the following items on hand:
- Lemon tree cuttings: Select healthy, disease-free cuttings from an existing lemon tree.
- Tissue paper: Used to maintain moisture around the cuttings.
- Plastic bags: Essential for creating a humid environment conducive to root development.
- A container: To hold the cuttings during the rooting process.

Step 2: Preparing the Cuttings
The next step is to prepare the lemon tree cuttings. Choose cuttings that are about 6-8 inches long and have at least two or three leaves. These leaves are crucial as they will help the cutting produce food through photosynthesis while it develops roots. Use clean, sharp pruning shears to make a clean cut just below a leaf node, which is where roots are most likely to form.
Step 3: Wrapping with Tissue Paper
Moisten a piece of tissue paper and wrap it around the base of each cutting. The moisture retained in the tissue paper is essential for preventing the cuttings from drying out. This step is crucial because maintaining consistent moisture levels encourages the cuttings to develop roots.
Step 4: Creating a Humid Environment
Place the tissue-wrapped cuttings into a plastic bag. Seal the bag to create a humid environment, which is vital for root development. Humidity helps to keep the cuttings moist and promotes faster root growth. Make sure the plastic bag is clear so that light can still reach the cuttings.
Step 5: Monitoring Growth
Position the plastic bag with the cuttings in a warm, bright location, but keep it out of direct sunlight. Direct sunlight can overheat the cuttings and cause them to dry out. Check the cuttings regularly to monitor their progress and ensure they remain moist. Within a few weeks, you should start to see roots forming at the base of the cuttings.
Step 6: Transplanting
Once the cuttings have developed a healthy root system, they are ready to be transplanted. Prepare pots with well-draining soil to avoid waterlogging, which can cause root rot. Gently place the rooted cuttings into the pots and firm the soil around them to provide support.
Step 7: Care for New Plants
After transplanting, it is crucial to care for your new lemon plants properly. Water the newly potted cuttings regularly, ensuring the soil remains consistently moist but not waterlogged. Place the pots in a sunny location where the young plants can receive adequate sunlight for optimal growth. Over time, as the plants grow stronger, you can gradually acclimate them to outdoor conditions if you plan to transfer them to your garden.
Conclusion: Successfully Grow Lemon Trees
By following these straightforward steps, you can successfully propagate lemon trees from cuttings. With patience and proper care, your cuttings will grow into healthy lemon trees, providing you with fresh lemons from your own garden. This method not only saves you money but also gives you the satisfaction of nurturing a plant from a tiny cutting to a fruit-bearing tree. Enjoy the process and the fruits of your labor!
Growing lemon trees from cuttings is a simple and effective way to expand your garden. By adhering to this guide, you’ll be able to propagate lemon trees with ease and enjoy the bounty of your efforts. Happy gardening!